My Edible Garden

I've been gardening for most of my life and have been a devoted fan of organic gardening the whole time. It just makes so much more sense to work in harmony with Mother Nature than to fight her. Besides which it is better for the planet and better for our bodies. Here you can see what I'm planting and harvesting, with gardening hints and resources thrown in for good measure.

Monday, March 12, 2012

Harvest Monday

home grown celery
Welcome to another Harvest Monday! Sponsored by Daphne's Dandelions this is a great blog hop to visit with gardeners from all around the world. (you don't have to be a blogger to go visiting, either).

With the lovely warm days and cool but not freezing nights the garden is really picking up, both out doors and in the greenhouse.

Besides my usual salad mix of lettuces, chickweed, lambs quarters, chard, spinach, sorrel, cilantro, I had a few mache plants this week too, just forgot to get a pic of them.

I cut one whole celery plant as a veggie for soup because it looked like it just might be trying to bolt. I haven't bothered with any blanching strategy on this celery, so I don't know if possible bolting or not blanching was responsible for the slightly bitter flavor or something else. But it wasn't bitter in the soup, so it's all good.

tiny broccoli head

The broccoli continues to put out side shoots but they also have just dime to quarter size heads on them. I've decided I don't really care, I just slice up the whole shoot, stem, leaf, itty bitty floret and all. Actually they say the leaves have more nutrition in them than the heads anyway.

snow peas

I've been picking a handful of snow peas every couple of days from the plants in the greenhouse.


greens!
I really love the Giant Red Mustard; a bit too spicy to eat raw in salad, it's wonderfully mild and sweet when steamed or braised. I've been picking mixed greens for cooking a couple of days a week. This photo show from left to right, Giant Red Mustard, a tend tip from wild Lamb's Quarters and some green chard called Perpetual Spinach. I usually chop them all together and braise in chicken stock, sometimes adding a handful or two of shredded cooked chicken meat at the last minute. Some times I also have kale in the mix.

Chicken and greens!


Yellow turnips, white & purple carrots, red & white radishes
There are still a few root crops in the garden, some Golden Globe turnips, some white carrots (maybe Belgian whites), some Purple Dragon carrots, radishes of several colors. The carrots were volunteers at the edge of a bed from plants grown last in 2009. I got busy and forgot about them....


And then I have literally hundreds of baby plants indoors under the lights, you can see some of them here in my post about soil blocks.

Wednesday, March 7, 2012

Seed Starting in Soil Blocks

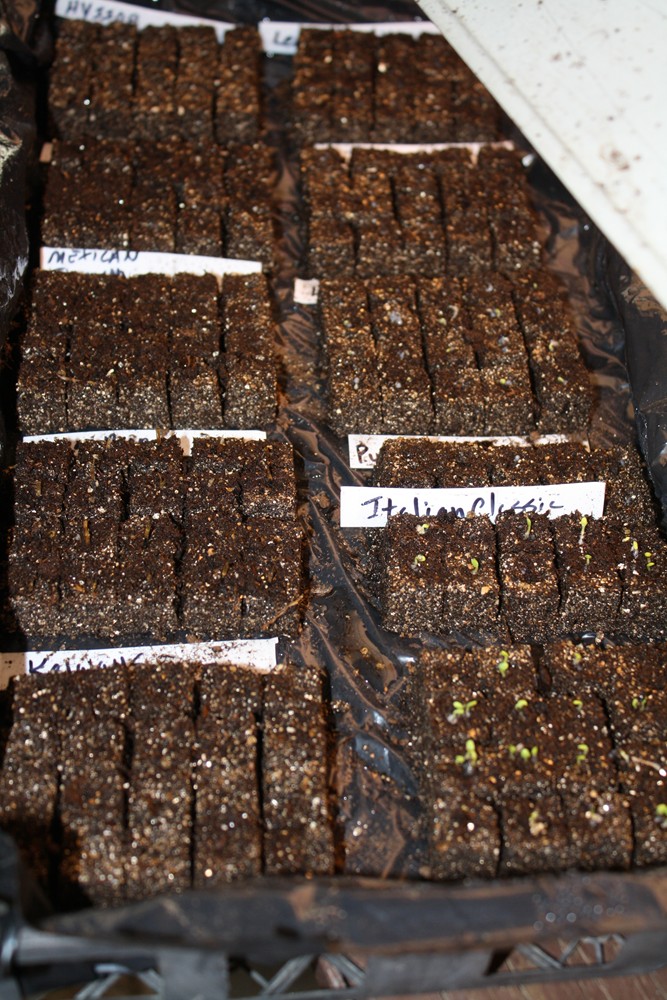
3/4" soil blocks; the basil sprouted in 2 days
I love both of my soil blockers, the 3/4" and the 2". They make it easy to start seeds indoors. This picture is a regular nursery flat, recycled, of course, with 200 of the 3/4" blocks. Two of these fit neatly on my germination mat under two 4 foot florescent lights.

(Click the picture to see a larger version) This batch has 4 kinds of basil, 3 marigold varieties (two of which are edible) along with some other herbs and flowers. Some of the seeds are really old and may not sprout. That's why I like doing them in these tiny blocks, if they don't sprout I haven't wasted too much space/time/energy. These tiny blocks are not meant for growing any plant for more than a few days, then they need to move up to the bigger, 2" blocks.

recycled salad container


When moisture and warmth are really critical I make blocks in things like this recycled salad container. I'll remove the plastic lid as soon as the eggplant seeds sprout.

Tomato seedlings germinate in 3/4" soil blocks


On another tray last week I started the tomatoes and peppers, these tomatoes need to move up to bigger blocks ASAP!

If you've never heard of soil blocks before, they are compressed blocks of peat based potting mix. They eliminate plastic pot waste and expense and provide an ideal environment for seed germination. For more information see my three part article on making and using soil blocks, "Seed Starting in Soil Blocks"

Tuesday, March 6, 2012

Permaculture & Chickens

Permaculture is not really just about gardening, but is a design parameter that can be used to design almost anything, including towns, businesses and even social areas or events. Since I got paid for some of my online articles and things I had a bit extra and decided to buy some new books. First was Gaia's Garden by Toby Hemenway. The other one I picked was Harvey Ussery's
Small Scale Poultry Flock. I've been browsing Harvey's blog and really liked what I saw.                                                          
                                                                sorry for the odd look of this post; I can't figure out how to make the Amazon iframes go where I'd like them too and put the text next to the box like I can with photos. But I think you get the point. My books should arrive by next Monday, I'll probably do a review when I'm done with them.

Monday, March 5, 2012

Can You Guess What it Is? (NO, it's not a bee!)

Hover fly
This little critter was busy enjoying the sweet alyssum blossoms in the greenhouse today. It looks like a bee, but look closer, there's no stinger at all. One of thousands of look a likes in the insect world, it's a hover fly.

I think it looks a lot like this picture of Myathropa florea  I spent a lot of time checking out all the great insect photos on that site and learned some interesting things. While the larvae of some hoverflies are a pest because they eat roots and bulbs, others are a boone to gardeners because they eat aphids.

Hoverflies come in all shapes, sizes and colors. There are a lot of different kinds that come visit my garden in the summer time, but they are rarely still enough for a photo, being always on the go. Some look like wasps and some resemble small house flies. Please don't swat them or spray them. We need them, because they are helpful in pollinating our gardens and in controlling some other insect pests. Besides they don't sting or bite and they are pretty interesting to look at.
Hover fly on sweet alyssum


Harvest Monday

Golden Ball Turnips
I"m a bit late getting in this Harvest Monday post, have had a crazy few days at work. Harvest Monday is sponsored by Daphne's Dandelions. Join in the fun seeing garden harvests from around the world!

In addition to the usual mix of salad greens, which I'm sure you are getting tired of looking at, this week I harvested some of the Golden Ball Turnips planted last fall. The plants had gotten off to a rocky start, showing a lack of iron &/or nitrogen, but a couple of feedings of fish and seaweed helped them along and they are finally sizing up.

I also harvested another bunch of carrots, but I forgot to take a picture of them. I cooked up the turnips with their greens and some of the carrots in some chicken stock then added some shredded chicken. The turnips especially were sweet and tender.

The chicken stock was made by boiling up a 10 pound bag of leg quarters that I got on sale, removing the meat, then boiling up the bones with some bay leaves, onion and a a bit of celery from the greenhouse. This is my first experiment in growing celery and I was afraid that I planted it too late and that it would bolt before getting big enough to be useable. Celery is a bog plant and the four best looking plants are in a large tub
Celery
of peat based potting soil in the greenhouse. (I mixed potting soil and compost together and added some rabbit manure to it). Plants in other containers and in the greenhouse bed have not grown as large nor are they as dark a green. These large plants are making little offshoots and that is what I am harvesting right now. I tend to use celery more as soup seasoning than as a vegetable, so for future reference will probably continue to grow just a few plants in large tubs since that seems to be the best.

Do you remember that Yellow Marble tomato plant that gave me tomatoes in Dec & Jan? Well it's still hanging in there, putting out a bit of new growth and some blossoms. (If you are just joining me, you can see pictures of it in this post)
Yellow Marble tomato lived all winter
The other day I cut out the other, dead plants from the pot and clipped off the dead branches off this plant. That clump of leaves in the middle of the pot is a Stella d'Oro daylilly.  I gently loosened and removed it, I filled in the hole it left with some vermicompost then curled the tomato stem back up and around into the pot. Tomatoes will root all along their stems if they are touching the soil. I actually covered part of the stem with more vermicompost to encourage it to take root. We'll see how it goes.


The Yellow Marble after trimming
In addition I've been starting seeds in the house on the heat mat; tomatoes, peppers, lemon mint and others; I"ll try and do a whole post on that later this week.

Monday, February 27, 2012

Harvest Monday

small broccoli shoots
Welcome to Harvest Monday a great blog hop sponsored by Daphne's Dandelions. Stop by and visit with gardeners from around the world!

This week some interesting things are beginning to happen, the tatsoi bolted before I got to it, so it became rabbit feed. Several broccoli plants had small (quarter size) heads and I feared they would also bolt so I cut them all. I had them stir fried with leftover pork roast, stems, leaves and all, they were quite tasty.


Blossoming pea shoots
I'm actually writing this on Friday as I'm leaving for the Creative Painting Convention in Las Vegas on Sat. I'll be back Tuesday night. The pea plants in the greenhouse are loaded with blooms so I picked most of them, along with some of the shoots. I had the blossoms, tasting slightly floral and sweet in my salad and I stir fried the shoots, which were also sweet and crunchy and tasted faintly of peas. Hopefully since I did this there won't be too many over grown peas when I get home.

When I get home it will also be time to ramp up the spring plantings, tomatoes, peppers, eggplants as usual, but also some leeks, more garlic chives, more lettuce, spring carrots and beets. It's been quite warm and hovering just above freezing at night. The peach and the plum tree are in full bloom and I suppose the apples won't be too far behind them. Hopefully we won't get any late snow storms to take them all.

Monday, February 20, 2012

Harvest Monday

lettuce & other greens, violas, radishes
Welcome to Harvest Monday, a great blog hop hosted by Daphne over at Daphne's Dandelions. Stop over there and visit with amazing gardeners from around the world.

This week besides the usual salads of baby lettuces, chickweed, red mustard, cilantro, sorrel, arugula and a few radishes, I harvested a bunch of carrots, some even actually a respectable size.

carrots
I also harvested some Giant Red Mustard from the large tub in the greenhouse along with some spinach and lamb's quarters to steam together, that was very yummy, but I forgot to take a pic!

Dwarf Grey Sugar pea blossom


All sorts of goodies are promising in the greenhouse, the peas have begun blooming so hopefully there will be a few pods on next weeks harvest tally.


Little Marvel Peas in Bloom


Ferry Morse Gourmet Lettuce Mix in a tub


F-B, onion, radish, misticanza lettuce, chard in the greenhouse bed


Wall pots of Sweet Alyssum smell like honey


All over Italy nearly every house and apartment, no matter how small the space has flowers growing in pots, especially geraniums. In many of the towns blank walls are covered with wall pots similar to these, full of blooms. Theirs tend to be larger and made of terracotta, some of them glazed and painted Majolica style. These are only about 13 inches across the widest part and are made of terra cotta colored plastic. I do like that they have built in saucers. They were easy to hang on two screws or nails in the wall. I got mine from Amazon after searching almost every where for them. They are not very expensive and I'm going to order some more. Wall pots are a great solution for those of us that are space challenged! I don't want the moss lined baskets because it is way to hot and dry here-those things would have to be watered three times a day even in the shade.

Monday, February 13, 2012

Harvest Monday

lettuce, kale, tatsoi and one lone mache plant
Welcome to Harvest Monday, a great blog hop hosted by Daphne's Dandelions. Stop over there and enjoy visiting with gardeners from around the world!

This week has been warm (for Feb.), dry and very windy. Also very crazy at my work and this week isn't much better. Going on 8 days straight tonight and the past two being graveyard. Looking forward to having 3 days off at the end though. Also looking forward, they are forecasting rain around Wed. and we sure need it badly.

Mostly harvested the usual salad greens this week, many types of lettuce, kale, cilantro, sorrel, chickweed, spinach, along with a couple of tatsoi and one lone mache plant. I did discover that I have mache volunteers in one bed, but they are tiny yet.

Here's a few more pics from inside the greenhouse. You can see some construction details in my post from the other day, Simple Homemade Greenhouse.
Blue bellied lizard

I have several small lizards and a couple of spiders running around in the greenhouse. This lizard fell into one of the big tubs and couldn't get out so I rescued it. It's belly is like electric blue.

The strawberries are beginning to bloom


Salad Bowel lettuce


This 24 inch pot of Salad Bowl lettuce gave me 6 oz in one picking.


tomato blossoms


The crazy Yellow Marble tomato is blooming!


And now I am off to bed; one more night of graveyard....

Wednesday, February 8, 2012

Simple Home Made Green House

The first section of the greenhouse was built in 2009. This show it in 2011 when I finished it so it runs the full length of the south side of the house.
A lot of you have asked to see more of the construction of my greenhouse. The design had several constraints. My house was built about 1900-1919 mostly it seems of scrap. There is no crawl space or ordinary foundation. It sits on huge timbers, probably scavenged from mining operations. The center section of the house has 10 foot ceilings and was probably the original structure. It was added onto over the years with shorter shed roofed additions. None of it is straight, level or plumb. Even the roof line is wavy. The south wall of the house is only 6 ft 7 in. on the inside, so the greenhouse is not very tall.

Greenhouse construction
On the outside there was a walkway about 5 ft. wide along the house even with the floor level. South of the walk way the ground rises almost 3 feet, there was a dry stone wall here. There had been a line of trees here which I had cut down about 20 years ago because they were hollow and full of fire ants. The stumps threw up a lot of suckers. Preparatory to building the greenhouse I had to pull down the stone wall and dig out all the stumps as best I could. I then rebuilt the wall along most of it's length and this became planting bed inside the greenhouse, topped with a 2x12 board frame.

If the south side of your house is level and clear then you can build a much wider greenhouse. If the south wall of your house is taller then you can build a much taller one. If you whole area is flat then you could have beds directly in the ground without retaining walls.  My dream home will be two stories with a greenhouse room the full height of the south side and about 12-14 feet wide. It will have in ground planting beds with a meandering brick and gravel pathway, a pond and stream running through it, where I can grow avocados and some citrus which I cannot grow here now.

2x4 screwed to side of house, pipe fits into hole, plastic stapled to top of 2x4
Construction of the greenhouse is very simple. I've lost the book mark to the video where I first saw this method. As far as I know in most places this construction will not require a permit since it is made of plastic pipe, but you should check with your local authorities.  All of the lumber used in mine is scavenged scrap and second and third hand, which is why some of it looks like it does.  I used 2x4s screwed to the house wall with a hole drilled through them every 4 feet to take the ends of the PVC pipe.  This sets the ends of the pipe right up under the eave of the house.

I set a 2x12 (you could use a 2x6, I just happened to have a 2x12) at the outer edge of the greenhouse and then played around with my tape measure to get an idea of how long to cut the pipes. Just keep in mind that you don't want the pipes to bulge upward from the house wall, they should arc gently to the ground. Once I figured out the pipe length I cut all the pipes to size.

The frame showing the wire mesh and the wood it's wired to.
Because the greenhouse wall doubles as a trellis for plants in the summer I covered the bottom 5 feet with concrete reinforcing wire, so 5 feet from the end I drilled a hole through all the pipes. These holes are for small bolts to fasten a piece of 1x3 wood to. This is to give me a place to wire the reinforcing mesh to and to staple the plastic to.

The bottom of the PVC attached to 2x12 baseboard on inside
The 2x12 at the outer edge of the green house has metal fasteners to accept the ends of the pipe. Then a screw is put through the wood and into the pipe to keep the pipe from sliding further down.


fairly simple end framing, seen here without the door in place
On the end of the greenhouse I built a frame work from 2x4s to staple the plastic to and I built a door of 2x4s. These areas all have half lapped joints. The hardest part is to work with the curved edge which was a matter of trial and error for me. The two ends of my greenhouse are made differently. I haven't gotten around to building a second door yet. The current door has chicken wire stapled to it to help keep stray dogs and pigs out of it when there is no plastic on it. When it warms up this spring I'll build another similar door on the other end.

When covering the greenhouse with plastic  I cover the bottom part by stapling to the 1x3 board, then pull it smooth and staple it to the 1x12 at the bottom. I pull the edges tight and staple them to the wooden frame at the ends; this way you have a pretty good seal at the ends. For the top of the greenhouse first I staple the length of the plastic to the 2x4s that are attached to the house. Then I use fasteners that are made to go on plastic and will accept a rope or bungee cord. I use bungee cords attached to stakes, concrete blocks or what have you to stretch and anchor the top plastic and keep it as tight as possible. With this method I can open up the whole top of the greenhouse for venting when it gets too warm in spring. Then I cover the ends and the doors. I only got one door made, so at the far end I stapled the plastic to the top part of the frame and just weighted the bottom with rocks. That way I can open it for venting if needed.

Sept. 2011 Greenhouse frame covered in morning glories.
When the weather is getting pretty warm I start vine crops like cucumbers or flowers like morning glories to cover the trellis and help shade the house during the summer.

The greenhouse does freeze inside, in fact the air temp is usually almost the same as outdoors overnight. But the sun heats up the pots and soil during the day and I think that warm soil is part of why the plants grow so well in it, as well as the warmer temps during the day. During the winter on warm sunny days I open up the windows and get some of that lovely warm humid air into the house. The greenhouse also helps keep cold drying wind off the plants and I think that helps their growth too. Experiment, build your own little green shelter from what ever you have available and have fun!

Monday, February 6, 2012

Harvest Monday

Salad mix Jan. 30, 2012
Welcome to Harvest Monday, a lovely blog hop sponsored by Daphne at Daphne's Dandelions. Stop by and check out what gardener's all around the world are harvesting.

I harvested some lovely salads this week. The large 24" pots of Salad Bowl lettuce in the green house are getting big enough to pick, (4 oz from one picking) the chickweed is starting to take off and the Lamb's Quarters are also picking up.

This weeks salads have contained lettuce, red mustard, chickweed, Lamb's Quarters, cilantro, sorrel, violas, violets, spinach, chard, arugula and radishes.

baby carrots
I picked another small batch of baby carrots as well.  The totals for January were 7.84 lbs of produce with a  retail value of $29.36

In another experiment I have been trying to cut some clover, edible weeds, bolting arugula, even apple tree trimmings, each day to feed to the rabbits. Sometimes there isn't much and sometimes my work schedule keeps me from being able to do this. I've been recording the results in the tab up top about animal feed harvested.


Interesting that feeding less than 30 pounds wet weight of fresh feed resulted in a savings of 56 pounds of purchased feed...... Perhaps fresh organic feed is more satisfying. I will continue to experiment and record the results. I do intend to breed one or two of the does to kindle in March, if I can get their cages fixed. So we'll see how that pans out with the fresh feeding.

*edit* I've realized that there is a terrible typo in my figures. There are only 4 rabbits, not five so the feed savings is 25 pounds of feed....