My Edible Garden

I've been gardening for most of my life and have been a devoted fan of organic gardening the whole time. It just makes so much more sense to work in harmony with Mother Nature than to fight her. Besides which it is better for the planet and better for our bodies. Here you can see what I'm planting and harvesting, with gardening hints and resources thrown in for good measure.

Monday, November 21, 2011

HARVEST MONDAY

bowl gourds
Every Monday, Daphne of Daphne's Dandelions hosts Harvest Monday; a nice little blog hop where gardeners show off what they have harvested during the previous week. I don't always remember to take pictures of everything, besides some of it would be boring. After all, one batch of baby lettuce looks a lot like all the others.

So this week there are these three bowl gourds. I was surprised the seeds sprouted at all, they were about 5 years old, one sprouted and grew quite large. The top gourd in the photo was the first to form, before I went on vacation. While I was gone another one came along and then the last one after I got home. I'm pretty sure the first one will be ok, but the other two are still pretty green, so I'm not sure they are going to dry out well enough, since I planted these fairly late in the season.

Drying Nepeta and baby lettuce
Early on in the week I harvested 5 ounces (wet weight) of catmint, aka catnip and Nepeta. This herb is a nice tea mint and of course if you have cats it will make them crazy ;-)  And of course some baby lettuces.

baby lettuce with Easter Egg radishes


Yesterday I was harvesting lettuce and realized I had also planted some Easter Egg radishes in that bed. The plants didn't really look that big, but when I poked in the dirt around them, there were some radishes.

Harvest totals this week:

Catmint  5 ounces
Lettuce  30 ounces (1.875 pounds)
Radish   1/2 ounce

Sunday, November 20, 2011

BOUNTIFUL BASKETS

On Saturday I participated in a new program starting up in my community called Bountiful Baskets. This is an all volunteer group that is bringing fresh, low cost produce to families. This co-op is all over the US so go check them out and see if there is one in your community and if not, volunteer to start one!

This is the best deal, this is a co-op, everyone pools their money and then volunteers buy and deliver the produce. A regular basket is $15 or you can get organic for $25. They also have additional products like rolls and breads that you can buy extra. The very first time you participate there is a one time fee of $3. This is so your volunteer can buy a laundry basket to sort your produce into. You take your own bags or boxes to take your produce home in.

This is what I got for my $15 this time, some red potatoes and two really huge onions, 2 pounds of carrots, 2 bunches of celery, 2 bunches of spinach a box of cherry tomatoes, a bunch of bananas, some pears, apples, tangerines and fresh pineapple, which I gave away because I can't eat them.

I'd like to encourage everyone to look into this program and join up, it's a great way to save money and eat better too!

Garden Tour

south side of the house, green house under construction
Here are some pics of the small back garden along with some progress on the green house. The greenhouse is a pretty simple structure, lengths of PVC are attached to a baseboard with the other end stuck in a hole in a 2x4 that is attached to the side of the house right under eave. About 3 feet down from the top a small board is bolted to the pipe for rigidity and the bottom 5 feet is covered with concrete reinforcing mesh. The helps support the plastic and becomes a trellis in the summer. In this first pictured you can see the nearly dead morning glories and the still trying to grow gourd vine. In this picture you can see the first part of the greenhouse which I got done a few years ago. Right now I'm working on carrying it completely along the south side of the house. Because the garden area is about 3 feet higher than the house and the house eaves are just over 6 feet tall the greenhouse is not very wide. But at least it's something.

Backyard Garden
This is an over view of part of the back garden looking towards the east. The junk pile at the front is the last bed that needs to be dug and put into production, the edge of it is where there was a giant tree stump that took forever to dig out of the way.


yellow beets plant Aug.
Broccoli and Cauliflower seedlings
carrots and clover
baby lettuce and clover
lettuce bed after cutting; Bleushokker peas on left
another bed of lettuce

Friday, November 11, 2011

Today's Harvest: lettuce, beet, tomatoes

Harvest 11-11-11, baby lettuce, yellow marble tomatoes, a yellow beet
Today's harvest is small compared to how much food I actually eat, but things will get bigger and better as I go along. I picked 8 ounces of mixed baby lettuce, 4 ounces of Yellow Marble tomatoes and the biggest beet in the patch. The beet & greens together weighed in at 1 pound, 3 ounces. The root alone weighed 5 ounces.

The root really is that bright of a golden yellow. When cooked it loses most of the color and is a very pale yellow, almost white.  The ratty outer leaves and the tough stalks went to the rabbits; the tender leaves were part of tonight's dinner along with the root which is super sweet and not quite as earthy as red beets I grow.

I don't know the name of this beet and I'm not sure but it might even be a cross between a couple of kinds.You see I bought a mixed package of Heritage beets from Bountiful Gardens probably about 8 years ago. There were several really huge white beets in the mix, which I let go to seed. There might have been a yellow one in there too, I really don't remember now. That would have been about 2005. I still have more than half a pint of seeds left, but germination is beginning to drop off a tad. Most of the seeds sprout, but instead of several plants from one seed ball, they are tending more to just one. Which is OK, it means a lot less thinning for me.  I will probably let some of them go to seed next year, just to replenish the supply.

Also I'd like to draw your attention to the tabs across the top of the page. These are extra pages I've added to the blog which I'll be updating from time to time, especially the amounts harvested and worth of produce but also the varieties I'm growing. That page will eventually be in alpha order, but for now it's a little random. The worth of produce is the price I'd have to pay for a comparable product at the local market.

And since I didn't harvest anything else since Friday, I'll list this post for Harvest Monday over at Daphne's Dandelions, a great place to connect with other gardening bloggers and what they are harvesting from their gardens.

HOW MUCH LAND DOES IT TAKE TO GROW YOUR OWN FOOD?

Home Grown Goodness
How much land does it take to grow your own food? Well that covers a lot of territory and there are a lot of variables. Are you talking about ALL of your own food? Are you talking about a typical American diet or a strict vegan diet? Are you talking about a 6 month growing season or do you only have 4 months or maybe you are luck and have 9 months.

I give you some general ideas and some resources to check out in my new article: HOW MUCH LAND DOES IT TAKE TO GROW YOUR OWN FOOD?

In the meantime I will be working on this question myself, here in my edible garden. It will probably take me a couple of more years to get my soil into the best shape for doing it, but I'm hoping I'll be totally sufficient in vegetables by the end of 2012, at least 50% sufficient in fruit by 2014 and totally and completely sufficient in veggies, fruit, meat, milk and eggs by 2020. So what are your goals for the next few years?

Monday, November 7, 2011

Planting Peas

Of course I love peas of all kinds; I've probably told you that a few times already. This years roster so far is Sugar Snap, Sweet Magnolia, Bleushokker, Early Perfection and Mammoth Melting Sugar. Yesterday afternoon I planted the Melting Sugars in the bed where the beans were. I took out the shorter trellis of weld wire and replaced it with a chicken wire trellis down the center of the bed.

Soil prep for pea planting
After I put in the brackets to hold the trellis poles I ran a string between them and dug a trench down the center of the bed. Here you can see I've dumped in about 6 inches of rabbit manure. If you don't have manure compost will also work. Then I leveled the bed, covering the manure with about 2-3 inches of soil. Then I covered the whole bed with several inches of sifted compost.


Planting Peas
Next I used my triangular hoe to make a small trench on each side of the trellis after I put it up. I set the pea seeds every couple of inches in the furrow then covered them with about 1/2 - 1 inche of soil and watered the bed well. It's also been raining off and on since I planted them so they should be coming up pretty quickly, usually about a week this time of the year.

I've written an article about peas, How to Grow Peas and a few years ago I grew six varieties of peas and wrote 6 Pea Varieties on Trial.   

STONE WALLS

Stone walls, Nov 2, 2011
Well here is where I left off on the walls last week. It has been rainy and grey since then. The corner on the left is the height the left hand side will be going to. As you can see the right hand side above the culverts needs to come up higher. I have enough cement to make one more batch but I don't know if the weather is going to cooperate.


Stone Wall above the culverts


Here is the wall from above the culverts. As you can see I still have to haul some dirt and fill in behind the wall where the July 4th storm washed so much away.

In the meantime I did harvest some lettuce and baby beets yesterday and I *thought* I took pictures of them but I guess I didn't.

Sunday, November 6, 2011

Saving Seeds: Onions

With everything that went on July 4th and after (see my posts here) I forgot all about these guys. I save a lot of my own seeds for my garden. This picture is the seed head of an heirloom onion called Italian Red Bottleneck, which I obtained from the Seed Savers in Iowa. Each of the little bud like things was a small flower and now have several small black seeds in them.

You can see where one of the pods has split open, exposing the small black seeds. When a couple of pods have opened I go ahead and cut the whole stem and bring it into the house to finish drying out.

[edit]Which I did and now they are very dry and ready to clean, which hopefully I'll get to in the next day or so. In the meantime I will publish this post which should have been done back in July; don't know how it ended up still being a draft all this time....
I learned a lot about saving my own garden seeds from Carol Deppe's book, I think it should be on every gardeners reading list! She is a geneticist by training and a serious gardener. Her instructions are very easy to understand and implement in the garden.

THE LOSS OF OUR FOOD CROPS


National Geographic Magazine - NGM.com This chart shows up the dangerous loss of genetic diversity to our food crops. In 80 years of corporate farming we have lost about 93% of the varieties grown in 1903. Just imagine the colors and flavors of the vegetables that were available to our grandmothers that we no longer have access to. Before the advent of industrialized farming where everything must be exactly the same size shape and color, people ate in a much more diverse way. Before the widespread use of electric refrigeration our ancestors had special varieties of food crops that were best for certain uses, for fresh eating, for storing away in a root cellar, for keeping well in the field overwinter, for canning, for pickling. That is why I try to buy and grow heirloom varieties whenever possible, to keep our diverse agricultural heritage alive. Adopt some heirloom fruits or veggies this next growing season, save some seeds and pass them along to your friends and neighbors, buy local and organic whenever you can, keep your small farmer or market gardener in business. Good for your health, good for the economy, good for the Earth!

Wednesday, November 2, 2011

Today's Harvest

Yellow Marble & Princepe Borghese tomatoes
Several tomato plants volunteered in this pot, mostly Yellow Marbles, but surprise, also a Princepe Borghese, an Italian drying tomato. I picked about two ounces of them today.

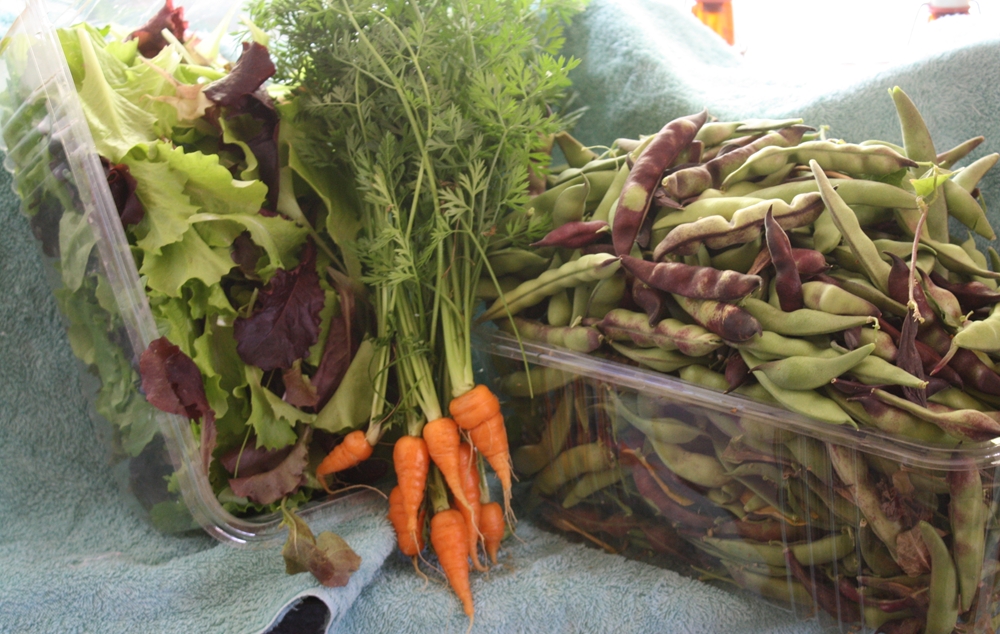
Lettuce mix, baby carrots, Hopi Purple Pod Beans
Since the days are getting shorter and the nights cooler I know it's just a matter of time until ol' Jack Frost runs by and wipes out the bean plants. So today I picked all the beans and pulled the vines out. I need to get more peas planted. Besides tomatoes today's harvest was 6 ounces of baby lettuce, 2 ounces of baby carrots (roots only) and 5 pounds, 14 ounces of beans in their pods. I don't have time to shell them before I go to work but suspect the shelled weight will be somewhere around 2 1/2 pounds.

Each Monday Daphne's Dandelions has a Harvest Monday post, so I'll add my link over there. Happy Growing!